Spark cluster on OpenStack with multi-user Jupyter Notebook
Apache Spark is gaining traction as the defacto analysis suite for big data, especially for those using Python. Spark has a rich API for Python and several very useful built-in libraries like MLlib for machine learning and Spark Streaming for realtime analysis. Jupyter (formerly IPython Notebook) is a convenient interface to perform exploratory data analysis and all kinds of other analytic tasks using Python. In this post I’ll show step-by-step how to set up a Spark cluster on OpenStack and configure Jupyter with multi-user access and an easy-to-use PySpark profile.
Setting up a Spark cluster on OpenStack VMs
To get a Spark standalone cluster up and running, all you need to do is spawn some VMs and start Spark as master on one of them and slave on the others. They will automatically form a cluster that you can connect to from Python, Java and Scala applications using the IP address of the master node. Sounds easy enough, right? But there are some pitfalls, so read on for tips on how to avoid them.
To create the first VM to be used as master node, I use the OpenStack command line client. We’ll get that node up and running first. The distribution is Ubuntu 14.04 Trusty. Cloud-init is an easy way to perform bootstrapping of nodes to get the necessary software installed and set up. To install and start a Spark master node I use the following Cloud-init script:
#!/bin/bash
#
# Cloud-init script to get Spark Master up and running
#
SPARK_VERSION="1.5.0"
APACHE_MIRROR="apache.uib.no"
LOCALNET="10.20.30.0/24"

# Firewall setup
ufw allow from $LOCALNET
ufw allow 80/tcp
ufw allow 443/tcp
ufw allow 4040:4050/tcp
ufw allow 7077/tcp
ufw allow 8080/tcp

# Dependencies
apt-get -y update
apt-get -y install openjdk-7-jdk

# Download and unpack Spark
curl -o /tmp/spark-$SPARK_VERSION-bin-hadoop1.tgz http://$APACHE_MIRROR/spark/spark-$SPARK_VERSION/spark-$SPARK_VERSION-bin-hadoop1.tgz
tar xvz -C /opt -f /tmp/spark-$SPARK_VERSION-bin-hadoop1.tgz
ln -s /opt/spark-$SPARK_VERSION-bin-hadoop1/ /opt/spark
chown -R root.root /opt/spark-$SPARK_VERSION-bin-hadoop1/\*

# Configure Spark master
cp /opt/spark/conf/spark-env.sh.template /opt/spark/conf/spark-env.sh
sed -i 's/# - SPARK_MASTER_OPTS.*/SPARK_MASTER_OPTS="-Dspark.deploy.defaultCores=4 -Dspark.executor.memory=2G"/' /opt/spark/conf/spark-env.sh
# Make sure our hostname is resolvable by adding it to /etc/hosts
echo $(ip -o addr show dev eth0 | fgrep "inet " | egrep -o '[0-9.]+/[0-9]+' | cut -f1 -d/) $HOSTNAME | sudo tee -a /etc/hosts

# Start Spark Master with IP address of eth0 as the address to use
/opt/spark/sbin/start-master.sh -h $(ip -o addr show dev eth0 | fgrep "inet " | egrep -o '[0-9.]+/[0-9]+' | cut -f1 -d/)
Save this as init-spark-master.sh for use with the OpenStack command line client. The script first adds some firewall rules to allow access to the different components and installs the OpenJDK dependency. Next, a Spark tarball is downloaded, unpacked and made available under /opt/spark on the host. The tarball is prepackaged with Hadoop v1 libraries (note the “hadoop1.tgz” suffix), so adjust this if you need Hadoop v2 instead.
The only configuration of Spark we need at this point is to set the options “spark.deploy.defaultCores” and “spark.executor.memory”. They are used to configure how much resources each application will get when it starts. Since the goal is to set up a multi-user environment with Jupyter notebooks, we need to limit the total amount of CPU cores and RAM that each notebook will use. Each notebook is an “application” on the cluster for as long as the notebook is active (i.e until it is shutdown by the user). If we don’t limit the resource allocation, the first notebook created will allocate all available CPU cores on each worker, leaving no CPU cores free for the next user. In addition, the default RAM allocation for each app is only 512 MB on each worker node, which might be a bit too small, so we bump that up to 2 GB.
The echo line adds “spark-master” to /etc/hosts with a reference to the IP address of the VM. Spark tries to resolve the local hostname on startup. Without a resolvable hostname you might encounter “Name or service not known”-errors, resulting in Java exceptions and exits.
On the last line the Spark master process is started. The master process is given the IP address of the local host as an argument to make sure it binds to the correct interface. The IP address is extracted from the output of the “ip addr” command.
One way to launch the master VM with the Cloud-init script is like this:
# Install OpenStack client if not present already
sudo apt-get -y install python-openstackclient

# Customize these values to match your OpenStack cluster
OS_IMAGE="f9c9b0dc-6407-4ac2-ad0e-45cb4e47bb01"
OS_NETID="df7cc182-8794-4134-b700-1fb8f1fbf070"
OS_KEYNAME="arnes"

# Create Spark master VM
openstack server create --flavor m1.medium --image $OS_IMAGE --nic net-id=$OS_NETID --key-name $OS_KEYNAME --user-data init-spark-master.sh spark-master
If you rather prefer using the web UI (Horizon), you could just as easily paste the Cloud-init script into the text box on the Post-Creation tab of the Launch Instance dialog and archieve the same result.
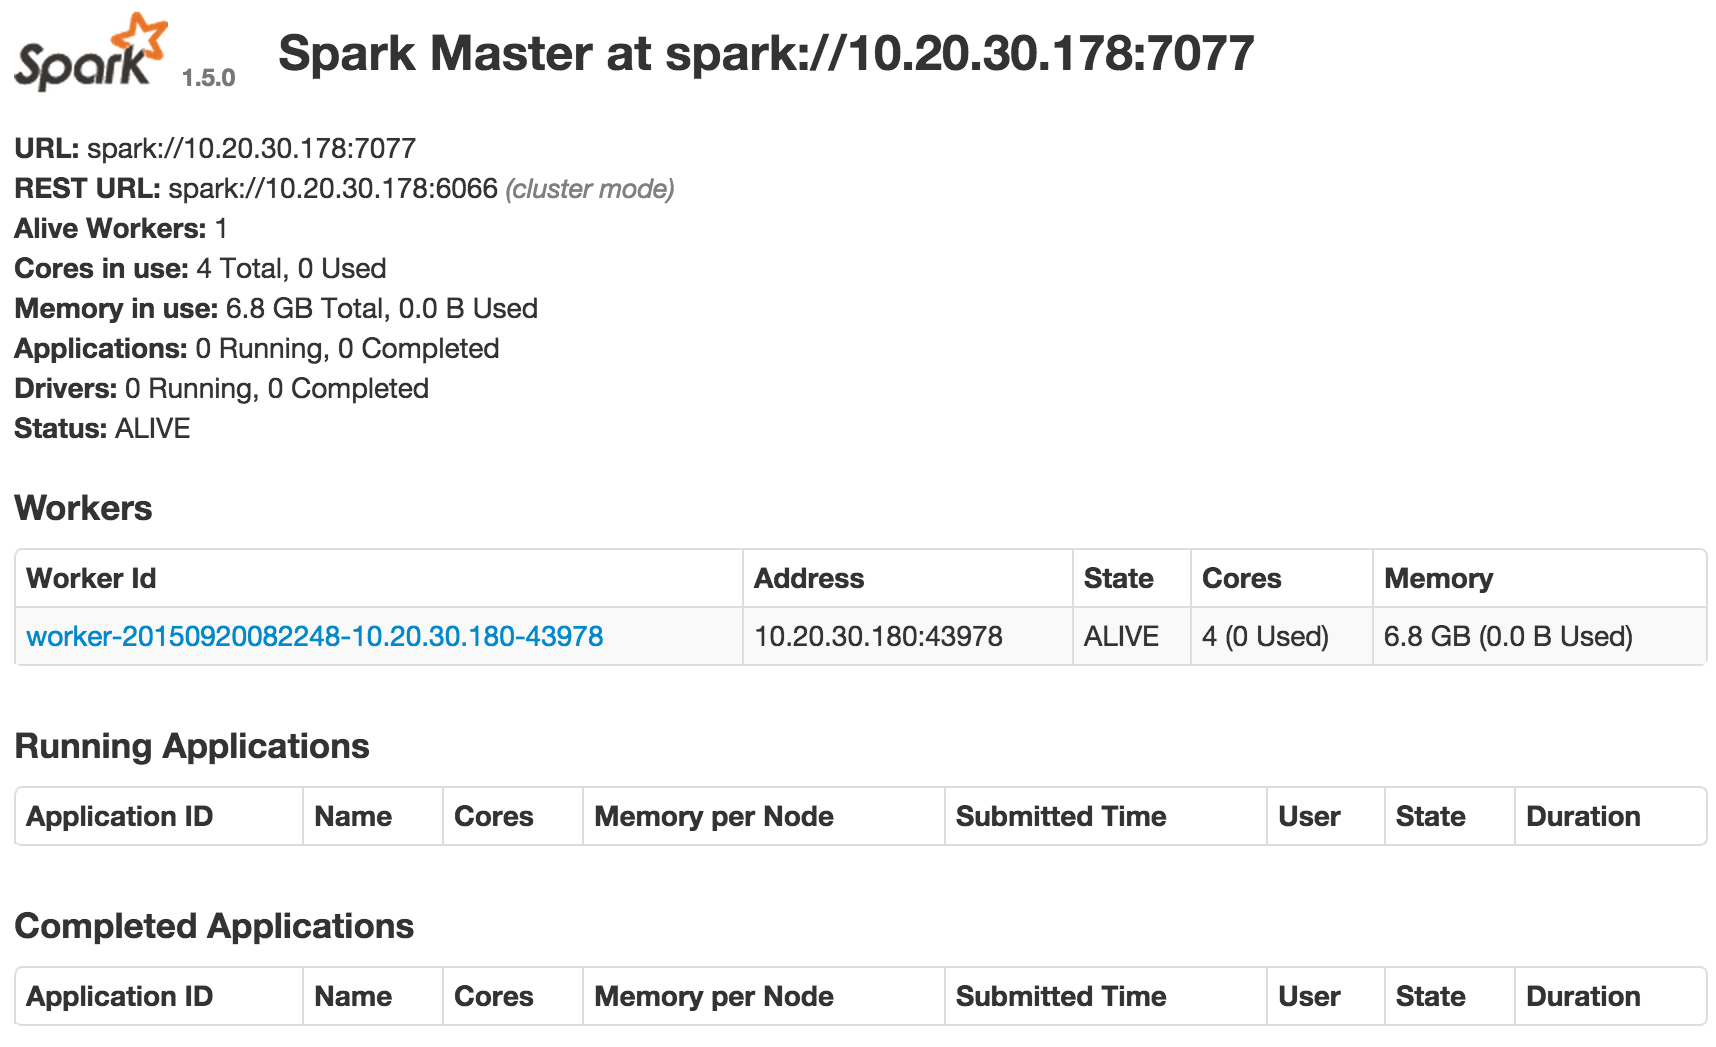
It will take some minutes for the Spark master VM to finish bootstrapping. When it’s done the Spark master UI will be available on port 8080. Remember to associate a floating IP to the VM to be able to access it from outside the OpenStack project:
openstack ip floating add 10.1.1.1 spark-masterVerify that the Spark master UI is reachable and displays metadata about the cluster. If the UI is not reachable, first check that your Security Group rules allow port 8080 to the Spark master VM. Second, check the Cloud-init logs on the VM to ensure all parts of the initialization succeeded. You’ll find the Cloud-init log file on the VM as /var/log/cloud-init.log and the output from the Cloud-init script in /var/log/cloud-init-output.log. You can also try to re-run parts of the Cloud-init script with sudo to narrow down any issues with the initialization. When initialization succeeds the Spark master UI will look like this:

As expected there are no workers alive yet, so let’s initialize some. To do so we use a slightly modified version of the Cloud-init script above. The main difference is the startup command, which is now /opt/spark/sbin/start-slave.sh with the address to the master as the only argument. Remember to adjust the variables below to your IP range and master IP address.
#!/bin/bash
#
# Cloud-init script to get Spark Worker up and running
#
SPARK_VERSION="1.5.0"
APACHE_MIRROR="apache.uib.no"
LOCALNET="10.20.30.0/24"
SPARK_MASTER_IP="10.20.30.178"

# Firewall setup
ufw allow from $LOCALNET
ufw allow 8081/tcp

# Dependencies
apt-get -y update
apt-get -y install openjdk-7-jdk

# Download and unpack Spark
curl -o /tmp/spark-$SPARK_VERSION-bin-hadoop1.tgz http://$APACHE_MIRROR/spark/spark-$SPARK_VERSION/spark-$SPARK_VERSION-bin-hadoop1.tgz
tar xvz -C /opt -f /tmp/spark-$SPARK_VERSION-bin-hadoop1.tgz
ln -s /opt/spark-$SPARK_VERSION-bin-hadoop1/ /opt/spark
chown -R root.root /opt/spark-$SPARK_VERSION-bin-hadoop1/*

# Make sure our hostname is resolvable by adding it to /etc/hosts
echo $(ip -o addr show dev eth0 | fgrep "inet " | egrep -o '[0-9.]+/[0-9]+' | cut -f1 -d/) $HOSTNAME | sudo tee -a /etc/hosts
# Start Spark worker with address of Spark master to join cluster
/opt/spark/sbin/start-slave.sh spark://$SPARK_MASTER_IP:7077
Save this as init-spark-worker.sh. Notice how the last line starts up a slave with the address to the cluster master on port 7077 as the only argument. Since the Cloud-init script has no worker-specific details, it is easy to expand the cluster just by creating more worker VMs initialized with the same Cloud-init script. Let’s create the first worker:
# Customize these values to match your OpenStack cluster
OS_IMAGE="f9c9b0dc-6407-4ac2-ad0e-45cb4e47bb01"
OS_NETID="df7cc182-8794-4134-b700-1fb8f1fbf070"
OS_KEYNAME="arnes"

# Create first Spark worker VM, this time with flavor m1.large
openstack server create --flavor m1.large --image $OS_IMAGE --nic net-id=$OS_NETID --key-name $OS_KEYNAME --user-data init-spark-worker.sh spark-worker1
Pause for a moment to let the worker creation process finish to ensure that Cloud-init does the necessary work without errors. There is no point in initializing more workers until the process is proven to work as expected. Again, it can be useful to check /var/log/cloud-init.log and /var/log/cloud-init-output.log on the new VM to verify that Cloud-init does what it’s supposed to do. On success you’ll see the worker in the Spark master UI:
Create some more worker nodes to scale the cluster to handle more parallel tasks:
openstack server create --flavor m1.large --image $OS_IMAGE --nic net-id=$OS_NETID --key-name $OS_KEYNAME --user-data init-spark-worker.sh spark-worker2

openstack server create --flavor m1.large --image $OS_IMAGE --nic net-id=$OS_NETID --key-name $OS_KEYNAME --user-data init-spark-worker.sh spark-worker3

openstack server create --flavor m1.large --image $OS_IMAGE --nic net-id=$OS_NETID --key-name $OS_KEYNAME --user-data init-spark-worker.sh spark-worker4
Verify that the new worker nodes show up in the Spark master UI before continuing.
Installing Jupyter and JupyterHub
A shiny new Spark cluster is fine, but we also need interfaces to be able to use it. Spark comes prepackaged with shells for Scala and Python where connection to a cluster is already set up. The same level of usability is possible to get with Jupyter (formerly IPython Notebook), so that when you open a new notebook a connection to the Spark cluster (a SparkContext) is established for you. The SparkContext is available through the variable “sc” in the notebook, ready to use by calling sc.textFile() to create an RDD, for instance.
JupyterHub is a multi-user server for Jupyter notebooks. That makes it possible for several users to use Jupyter independently and have their own notebooks and files in their home directory instead of a shared storage directory for all notebooks. However, this requires that each user has a user account on the VM where JupyterHub is running. Add user accounts for relevant users now if needed. JupyterHub uses unix authentication, meaning that it relays the username and password to the underlying authentication system on the VM for credential check.
In this deployment JupyterHub is installed on the Spark master VM and launched there. It could run on a separate VM, but there is normally no need for that since the Spark master process does not require that much resources. The VM where Jupyter notebooks are executed are called the “driver” in Spark, and that will require some processing power and memory use, depending on the use case.
SSH into the Spark master VM and run the following set of commands:
# Install pip3 and other dependencies
sudo apt-get -y install python3-pip npm nodejs-legacy
sudo npm install -g configurable-http-proxy

# Install JupyterHub and Jupyter
sudo pip3 install jupyterhub
sudo pip3 install "ipython[notebook]"
pip3 is used instead of pip because JupyterHub depends on Python >= 3.3. After installing all software and dependencies, start the JupyterHub service:
sudo jupyterhub --port 80The benefit of having JupyterHub listen on port 80 instead of the default port 8000 should be obvious, but it requires that you start the service as root. In addition you might want to look into securing JupyterHub with an SSL certificate and have it listen on port 443, since it asks for passwords when users log in. When you have the necessary certificate and keys on the VM, the service can be started like this instead:
sudo jupyterhub --port 443 --ssl-key hub.key --ssl-cert hub.pemNow try to open the JupyterHub login page on the floating IP address of the VM and log in. After login you should be greeted with an empty home directory with no notebooks. A new notebook can be created by clicking “New” on the right above the notebook list.
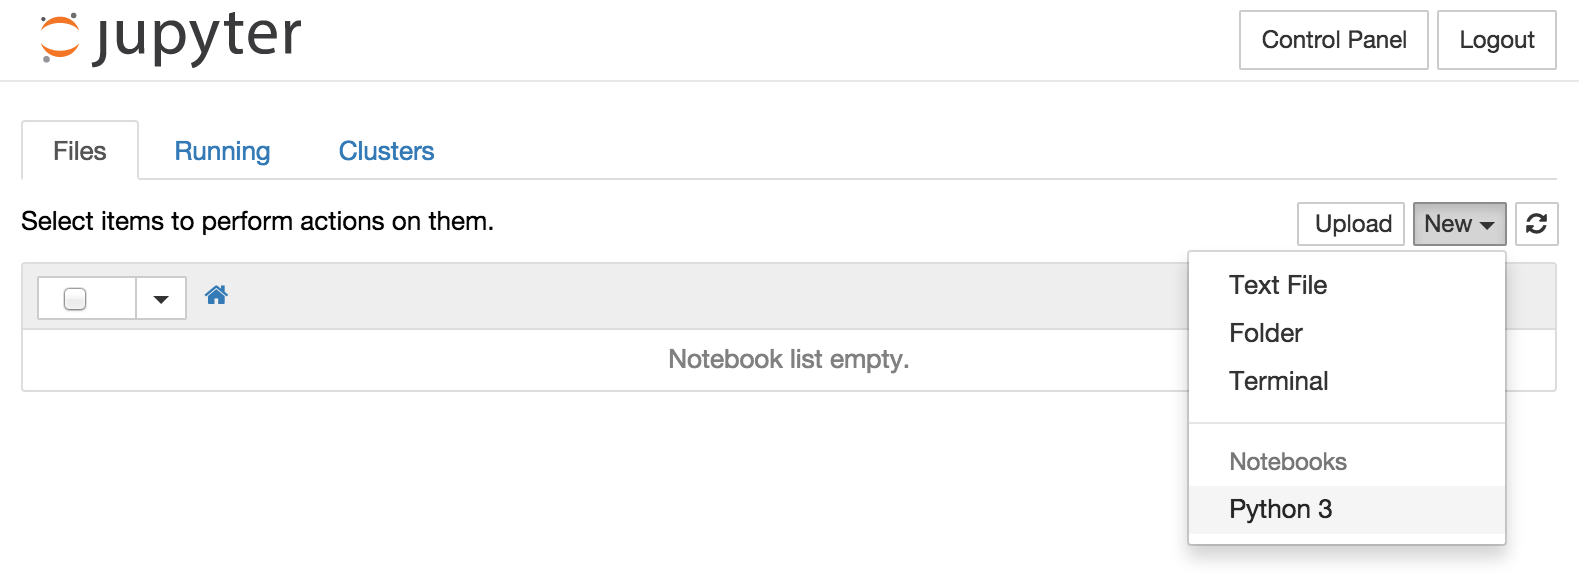
If you create a new notebook, you’ll notice that the only supported kernel is Python3 at the moment. We need to add PySpark to that list to be able to use the Spark cluster from Jupyter.
Configuring Jupyter for PySpark
Jupyter relies on kernels to execute code. The default kernel is Python, but many other languages can be added. To use the Spark cluster from Jupyter we add a separate kernel called PySpark. In addition, kernels can run specific commands on startup, which in this case is used to initialize the SparkContext. First, some dependencies need to be installed:
sudo apt-get -y install python-dev python-setuptools
sudo easy_install pip
sudo pip install py4j
sudo pip install "ipython[notebook]"
It might seem odd to install ipython[notebook] as a dependency, but the reason is that IPython/Jupyter contains a number of Python support modules that kernels rely on. Previously when we installed using pip3, we got the Python3 versions of those modules. When installing again with pip, we get Python2 versions. PySpark depends on Python2.
To add PySpark as a kernel, a file containing a kernel definition must be created. Kernel definitions are JSON files in a specific directory. Kernels can either be enabled globally for all users or for one user only, depending on where the definition file is placed. We want the PySpark kernel to be available for all users, so we’ll add it under /usr/local/share/jupyter/kernels/ like this:
sudo mkdir -p /usr/local/share/jupyter/kernels/pyspark/
cat <<EOF | sudo tee /usr/local/share/jupyter/kernels/pyspark/kernel.json
{
 "display_name": "PySpark",
 "language": "python",
 "argv": [
  "/usr/bin/python2",
  "-m",
  "ipykernel",
  "-f",
  "{connection_file}"
 ],
 "env": {
  "SPARK_HOME": "/opt/spark/",
  "PYTHONPATH": "/opt/spark/python/:/opt/spark/python/lib/py4j-0.8.2.1-src.zip",
  "PYTHONSTARTUP": "/opt/spark/python/pyspark/shell.py",
  "PYSPARK_SUBMIT_ARGS": "--master spark://10.20.30.178:7077 pyspark-shell"
 }
}
EOF
This kernel definition ensures that the Spark built-in “pyspark-shell” is started under the hood as the process where our code will be executed. Notice how the address to the Spark cluster, “spark://10.20.30.178:7077”, is sent as an argument. Remember to customize that address to your specific environment. The address references the Spark master VM (the same host as Jupyter runs on), but could just as easily reference an external host. For instance if you wanted to setup Jupyter on a separate OpenStack VM, or if you already have a Spark cluster running somewhere else that you want to connect to. The Spark master UI shows the right URL to use to connect, right below the Spark logo. Note that the Spark workers depend on being able to establish connections back to the host where the driver process runs (the Jupyter notebook), which may not be possible depending on the firewall setup when connecting to a remote Spark cluster. This is the reason a firewall rule allowing all traffic on the local network (10.20.30.0/24 in my case) is added by Cloud-init on all the Spark VMs.
After adding the kernel definition file for PySpark you’ll have to refresh the Jupyter homepage to see the new kernel in the list. No need to restart JupyterHub.
Debugging PySpark startup errors
If you get an error message about “Dead kernel” when creating new notebooks with the PySpark kernel, there might be several causes. For instance the VM running Jupyter might not be able to connect to the Spark cluster. Or it might lack some dependencies (packages/modules) to initialize the SparkContext. To debug kernel startup issues, first check the output from JupyterHub in the terminal where you started it (might be smart to keep that terminal open until everything works as expected). JupyterHub will for example output log lines like this when a Python module is missing:
[I 2015-09-20 20:31:24.276 ubuntu kernelmanager:85] Kernel started: 8a0b760d-357a-4507-a18b-da4bebd09e3f
/usr/bin/python2: No module named ipykernel
[I 2015-09-20 20:31:27.278 ubuntu restarter:103] KernelRestarter: restarting kernel (1/5)
/usr/bin/python2: No module named ipykernel
...
[W 2015-09-20 20:31:39.295 ubuntu restarter:95] KernelRestarter: restart failed
[W 2015-09-20 20:31:39.295 ubuntu kernelmanager:52] Kernel 8a0b760d-357a-4507-a18b-da4bebd09e3f died, removing from map.
ERROR:root:kernel 8a0b760d-357a-4507-a18b-da4bebd09e3f restarted failed!
[W 2015-09-20 20:31:39.406 ubuntu handlers:441] Kernel deleted before session
This error occured because I hadn’t installed ipython[notebook] using pip yet, so the Python2 modules needed by PySpark were not available. Notice how the error message states that it is /usr/bin/python2 that reports the error. Jupyter tries to restart the kernel a total of five times, but hits the same error every time and eventually gives up. In the notebook UI this is shown as a “Dead kernel” message.
Other errors can pop up in the Spark logs on master or worker nodes. Spark logs to /opt/spark/logs, so have a look there if anything is malfunctioning. The Spark master node logs every new application that is started on the Spark cluster, so if you don’t see output there when opening a new notebook with the PySpark profile, something is not right.
One last debugging tip is to try to start the PySpark shell from Bash on the VM where Jupyter runs. It is useful to inspect what happens when the PySpark shell starts. Here is an example of output when a dependency is missing:
$ python2 /opt/spark/python/pyspark/shell.py
Traceback (most recent call last):
 File "/opt/spark/python/pyspark/shell.py", line 28, in <module>
 import py4j
ImportError: No module named py4j
Remember to use Python2 when starting the shell. The above command mimics what Jupyter does behind the scenes when a new notebook is created.
Ready to use PySpark in Jupyter
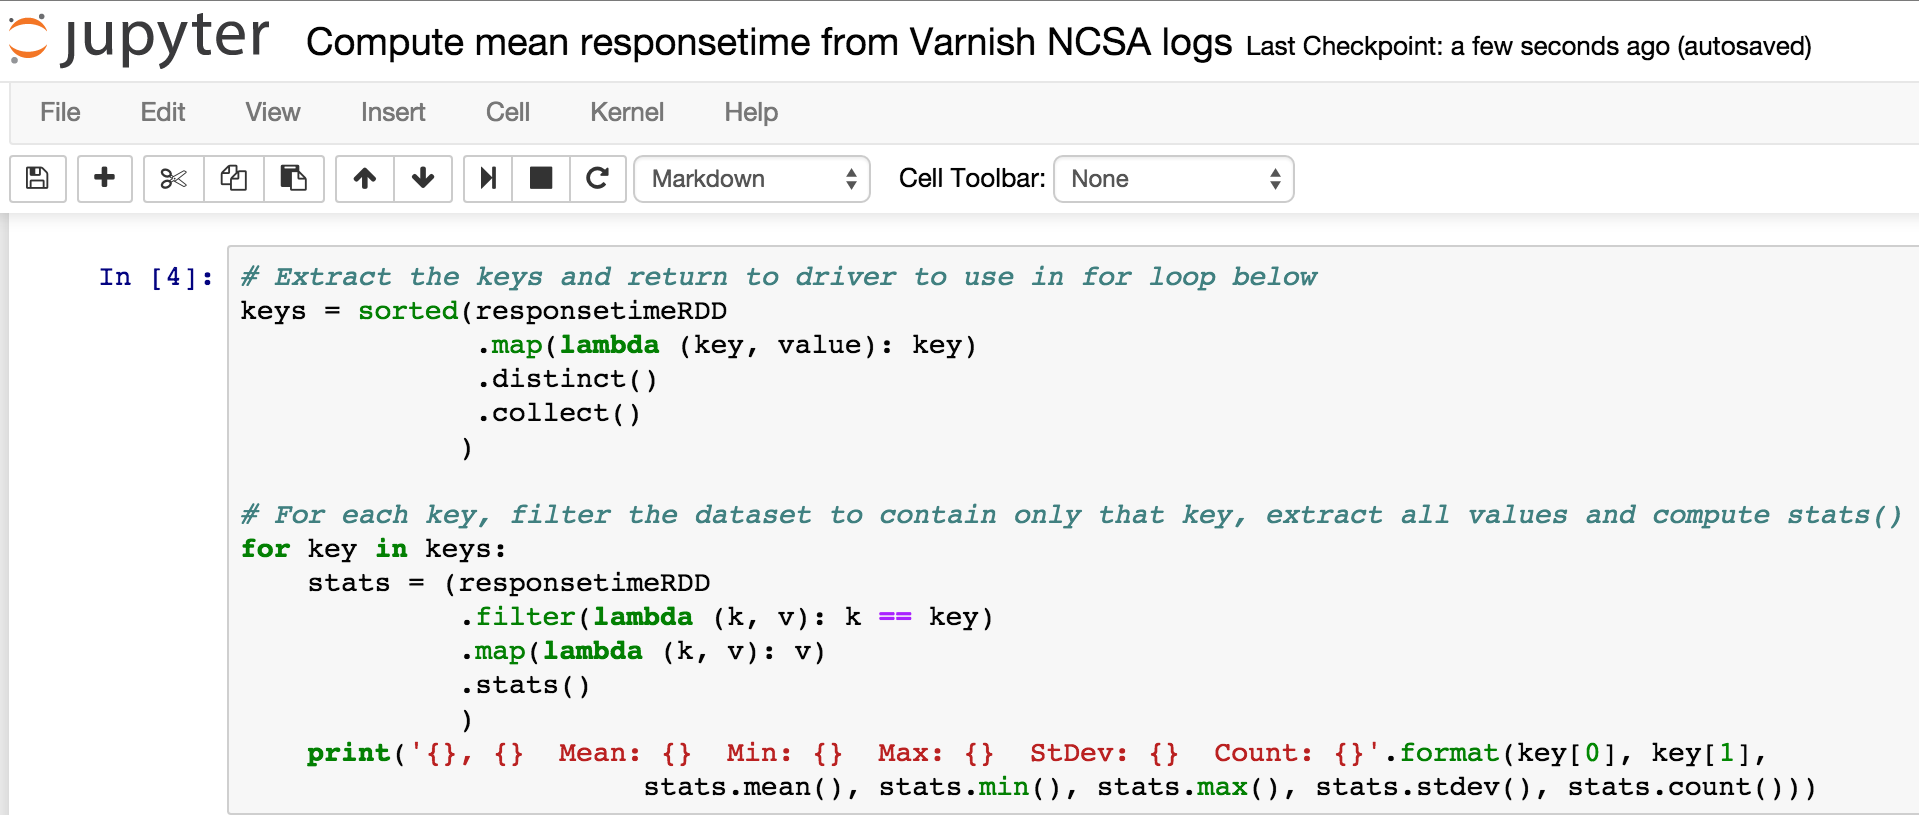
If everything went according to plan, you now have a Spark cluster which you can easily use from Jupyter notebooks just by creating them with the PySpark profile :-) The variable “sc” is initialized as a SparkContext connected to the Spark cluster and you can start exploring the rich Spark API for data transformation and analysis. Here’s a screenshot from a notebook where I extracted responsetime numbers from Varnish NCSA logs (web cache server logs) and computed common statistics like mean and standard deviation for the responsetime of each backend in use by the cache server:
~ Arne ~