How to Use Cloud-init to Customize New OpenStack VMs
When creating a new instance (VM) on OpenStack with one of the standard Ubuntu Cloud images, the next step is typically to install packages and configure applications. Instead of doing that manually every time, OpenStack enables automatic setup of new instances using Cloud-init. Cloud-init runs on first boot of every new instance and initializes it according to a provided script or config file. The functionality is part of the Ubuntu image and works the same way regardless of the cloud provider used (Amazon, RackSpace, private OpenStack cloud). Cloud-init is also available for other distributions as well.
Creating a customization script
Standard Bash script
Perhaps the easiest way to get started is to create a standard Bash script that Cloud-init runs on first boot. Here is a simple example to get Apache2 up and running:
$ cat > cloudinit.sh <<EOF
> #!/bin/bash
> apt-get update
> apt-get -y install apache2
> a2ensite 000-default
> EOF
This small script installs the Apache2 package and enables the default site. Of course, you’d likely need to do more configuration here before enabling the site, like an rsync of web content to document root and enabling TLS.
Launch a new web instance
Use the nova CLI command to launch an instance named “web1” and supply the filename of the customization script with the “–user-data” argument:
$ nova boot --flavor m1.medium --image "Ubuntu CI trusty 2014-09-22" --key-name arnes --user-data=cloudinit.sh web1
+----------+---------------+
| Property | Value         |
+----------+---------------+
| name     | web1          |
| flavor   | m1.medium (3) |
...
To access the instance from outside the cloud, allocate a new floating IP and associate it with the new instance:
$ nova floating-ip-create public
+------------+-----------+----------+--------+
| Ip         | Server Id | Fixed Ip | Pool   |
+------------+-----------+----------+--------+
| 10.99.1.71 |           | - | public |
+------------+-----------+----------+--------+
$ nova floating-ip-associate web1 10.99.1.71
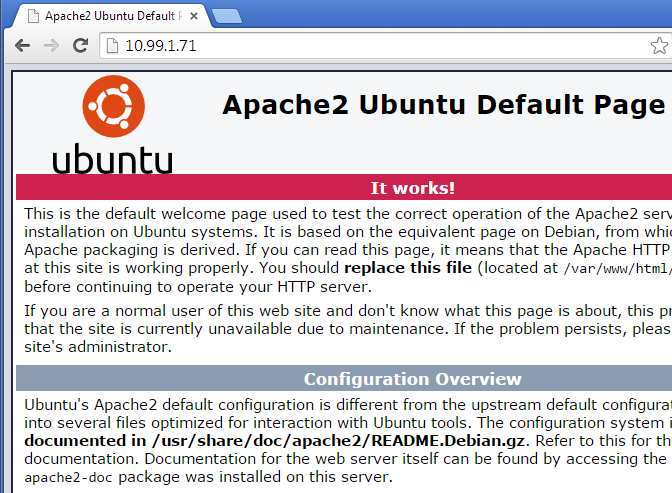
Results
The new web instance has Apache running right from the start, no manual steps needed:

More Cloud-init options: Cloud-Config syntax
Cloud-init can do more than just run bash scripts. Using cloud-config syntax many different actions are possible. The documentation has many useful examples of cloud-config syntax to add user accounts, configure mount points, initialize the instance as a Chef/Puppet client and much more.
For example, the same Apache2 initialization as above can be done with the following cloud-config statements:
#cloud-config
packages:
 - apache2
runcmd:
 - [ a2ensite, "000-default" ]
Including scripts or config files
Including a script or config file from an external source is also possible. This can be useful if the config file is under revision control in Git. Including files is easy, just replace the script contents with an include statement and the URL:
#include
https://gist.githubusercontent.com/arnesund/7332e15c5eb9df8c55aa/raw/0bd63296980bb4d8bf33387cfdb2eb60b964490d/cloudinit.conf
The gist contains the same cloud-config statements as above, so the end result it the same.
Troubleshooting
Cloud-init logs messages to /var/log/cloud-init.log and in my tests even debug level messages were logged. In addition, Cloud-init records all console output from changes it performs to /var/log/cloud-init-output.log. That makes it easy to catch errors in the initialization scripts, like for instance when I omitted ‘-y’ to apt-get install and package installation failed:
The following NEW packages will be installed:
 apache2 apache2-bin apache2-data libapr1 libaprutil1 libaprutil1-dbd-sqlite3
 libaprutil1-ldap ssl-cert
0 upgraded, 8 newly installed, 0 to remove and 88 not upgraded.
Need to get 1284 kB of archives.
After this operation, 5342 kB of additional disk space will be used.
Do you want to continue? [Y/n] Abort.
/var/lib/cloud/instance/scripts/part-001: line 4: a2ensite: command not found
2015-02-05 09:59:56,943 - util.py[WARNING]: Failed running /var/lib/cloud/instance/scripts/part-001 [127]
2015-02-05 09:59:56,944 - cc_scripts_user.py[WARNING]: Failed to run module scripts-user (scripts in /var/lib/cloud/instance/scripts)
2015-02-05 09:59:56,945 - util.py[WARNING]: Running scripts-user (<module 'cloudinit.config.cc_scripts_user' from '/usr/lib/python2.7/dist-packages/cloudinit/config/cc_scripts_user.pyc'>) failed
Cloud-init v. 0.7.5 finished at Thu, 05 Feb 2015 09:59:56 +0000. Datasource DataSourceOpenStack [net,ver=2]. Up 22.14 seconds
The line “Do you want to continue? [Y/n] Abort.” is a clear indicator that apt-get install failed since it expected user input. Most CLI tools can be run without user input by just passing the correct options, like ‘-y’ to apt-get. After correcting that error, the output is as expected:
The following NEW packages will be installed:
 apache2 apache2-bin apache2-data libapr1 libaprutil1 libaprutil1-dbd-sqlite3
 libaprutil1-ldap ssl-cert
0 upgraded, 8 newly installed, 0 to remove and 88 not upgraded.
Need to get 1284 kB of archives.
After this operation, 5342 kB of additional disk space will be used.
Get:1 http://nova.clouds.archive.ubuntu.com/ubuntu/ trusty/main libapr1 amd64 1.5.0-1 [85.1 kB]
Get:2 http://nova.clouds.archive.ubuntu.com/ubuntu/ trusty/main libaprutil1 amd64 1.5.3-1 [76.4 kB]
...
Cloud-init v. 0.7.5 running 'modules:final' at Thu, 05 Feb 2015 12:35:49 +0000. Up 38.42 seconds.
Site 000-default already enabled
Cloud-init v. 0.7.5 finished at Thu, 05 Feb 2015 12:35:49 +0000. Datasource DataSourceOpenStack [net,ver=2]. Up 38.56 seconds
This also reveals that the command “a2ensite 000-default” is not needed since the default site is enabled already. However, it’s included here as an example of how to run shell commands using cloud-config statements.
Testing vs Production
Using Cloud-init to get new instances to the desired state is nice when testing and a necessary step when deploying production instances. In a production context, one would probably use Cloud-init to initialize the instance as a Chef or Puppet client. From there, Chef/Puppet takes over the configuration task and will make sure the instance is set up according to the desired role it should fill. Cloud-init makes the initial bootstrapping of the instance easy.